CAN YOU FIT A KITCHEN SYOURSELF? THE HONEST DIY GUIDE
Author: Belinda Dangerfield
So, you’re thinking about a brand-new kitchen but your wallet’s giving you the side-eye. Naturally, the question pops up: “Can I fit a kitchen myself?”
The short answer? Yep, it’s possible. The long answer? Well… it depends on your skills, patience, and how much free time you actually have. Let’s walk through what you need to know before grabbing a drill and diving in.
DIY Kitchen Installation: Should You Even Try?
Here’s the deal. Installing a kitchen yourself can be done, but it’s not exactly a weekend project. You’ll want to feel confident in:
- Your DIY skills
- Planning and organisation
- Having enough time to actually finish the job
And a quick heads-up: if your project involves gas or electrical work, you have to call in certified pros. It’s not optional…
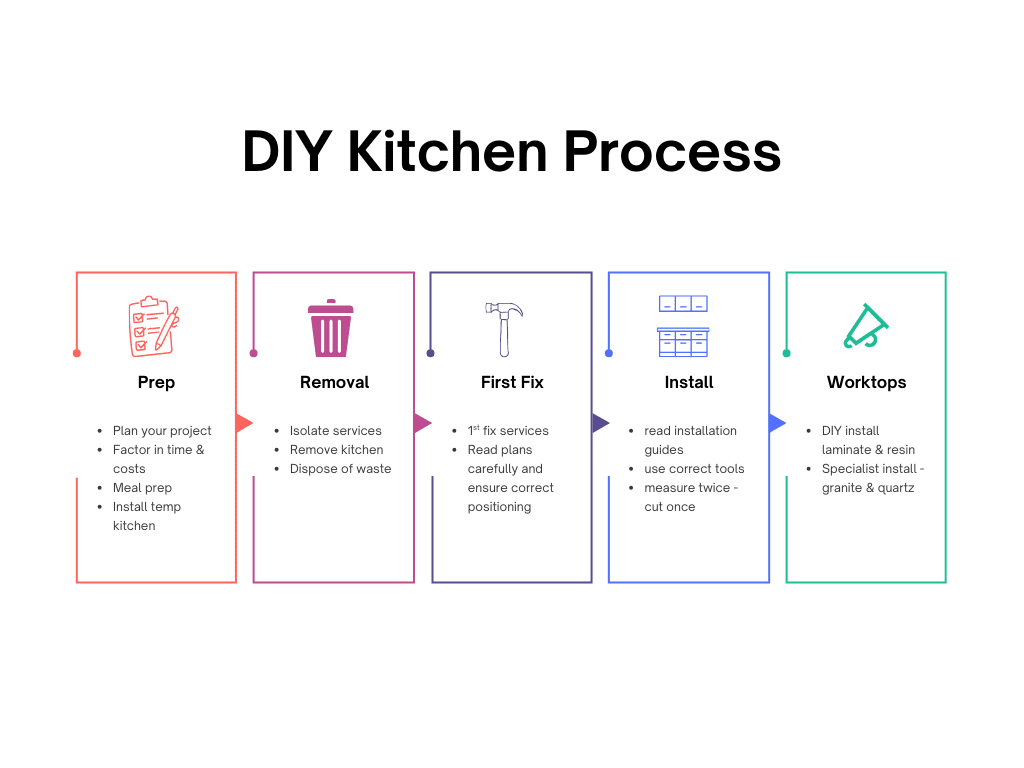
Step 1: Prep Before You Start
Before you lift a hammer, do some homework:
- Arrange waste disposal (skip hire or trips to your local tip)
- Turn off water, electricity, and gas
Tip: Before you start, do some meal prep and set up a temporary “mini kitchen” somewhere else in the house — even if it’s just a kettle, microwave, toaster and a small fridge in the utility room.
When your kitchen’s out of action, you’ll be glad you planned ahead. There’s not much point saving money on fitting costs if you end up spending it all on takeaways and eating out. A little preparation now can save you a surprising amount later.
Think of this as laying the groundwork — a little prep now saves a ton of stress later.
Step 2: Say Goodbye to Your Old Kitchen
Removing your old kitchen almost always takes longer than you think. Start small:
- Take off doors, drawers, and shelves
- Disconnect worktops
- Older kitchens? You might need a hammer to break stubborn units
Disposal options:
- Recycling centre
- Skip hire
- Professional removal service (fast, but more expensive)
Pro tip: Don’t try to rush this step — it sets the pace for the rest of your project.
Step 3: First-Fix Services — When to Call the Pros
Some parts are non-negotiable:
- Gas: Gas Safe engineer only
- Electrics: Qualified electrician for any changes
- Plumbing: Make sure pipes, stopcocks, and isolators are in the right place
Trust me: DIY has limits. Know when to step back and let the experts take over.
Step 4: Trades & Finishing Touches
- Plastering: Patch holes left from electricians
- Flooring: Lay before or after cabinets? Here’s the scoop:
- Before: Cleaner finish, easier setup, flatter surface
- After: Cheaper, sometimes necessary if your floor needs time to dry
- Decorating: Do a mist coat first; save the finishing touches for after units are installed
Tip: Skipping prep now = double work later.
Step 5: Installing Your New Kitchen
This is the exciting part, but don’t get carried away:
- Check units for damage right away
- Keep your project plans handy
- Read instructions carefully
- Measure twice, cut once!
- Secure corners & unsupported units (like dishwashers or washers)
Mini takeaway: A little patience now saves a lot of headaches later.
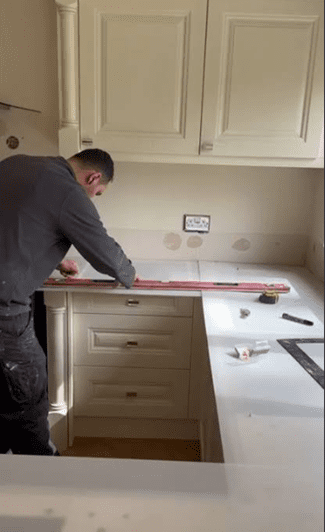
Step 6: Worktops — Where Precision Matters Most
Worktops can elevate your entire kitchen — but they’re often the trickiest part.
If You’re Choosing Stone, Quartz or Acrylic, you’ll almost certainly need a specialist fabricator.
Before they can template, your kitchen must be:
- Fully installed
- Perfectly level
- Sink position confirmed
- Appliances in place
⏳ Important: It usually takes 5–7 days from templating to installation, so factor this into your timeline. Your kitchen may be out of action during this period.
When templating, you’ll need to be onsite to confirm:
- Drainer groove direction
- Cut-out positions
- Overhangs
- Upstand heights
- Finishes on risers and window cills
- Socket placements
If you’re having an undermount sink, it must be positioned and properly supported with a secure frame.
Stone worktops are extremely heavy — support is critical.
If You’re Choosing Laminate or Resin
These options are more DIY-friendly.
They can usually be cut and installed onsite as part of the kitchen fit, making them:
- Faster
- More affordable
- Easier to manage
But you’ll still need to plan:
- Corner joints
- Sink mounting
- Achieving clean, tight finishes
If you’ve confidently installed everything else but feel daunted here — many homeowners choose to outsource just the worktops. And that’s completely sensible.
Tools You’ll Actually Need
Most DIY kitchen installs need:
- Drill
- Screwdrivers
- Spirit level
- Saws (circular, plunge, manual)
- Pliers, jigsaw, tape measure, carpenter’s pencil
If you’re not confident with some of these, it’s probably safer to hire a pro; even if its for the more complex stages of the kitchen such as worktop installation
How Long Will It Take?
Depends on:
- Kitchen size
- Complexity of your layout
- Your experience level
Extra time factors: integrated appliances, floating units, or heavy stone worktops. Laminate worktops are quicker, while resin or stone might require specialist tools.
First-timers should plan for a longer project than pros — it’s normal!
So… Can You Do It Yourself?
Yes — you can. But ask yourself:
- Am I confident in my skills?
- Do I have the time?
- Do I really want the stress?
If the answer is “no” to any of these, hiring a professional will save time, stress, and money.
Why Choose Qudaus Living?
If DIY feels overwhelming, we’ve got you covered:
- Custom design based on your plans or dimensions
- Technical surveys to get every detail right
- High-quality German & British cabinetry
- Integrated appliances (Miele, Bora, Siemens, Liebherr)
- Luxury sinks, taps, and worktops
- Advice and recommendations for professional fitting
Let us handle the hard part. Book a free survey today and get the kitchen you’ve always wanted — stress-free.